This guide will walk you through the whole process of setting up
nginx-proxy-managerreverse proxy with a free subdomain fromduckdns.orgwithLet's Encrypt Certificates
For simplicity I will demonstrate in this guide the option with a free subdomain from
duckdnsbut the same applies for domains you already own or ones you bought.
Step 1. Setup your own subdomain on DuckDNS
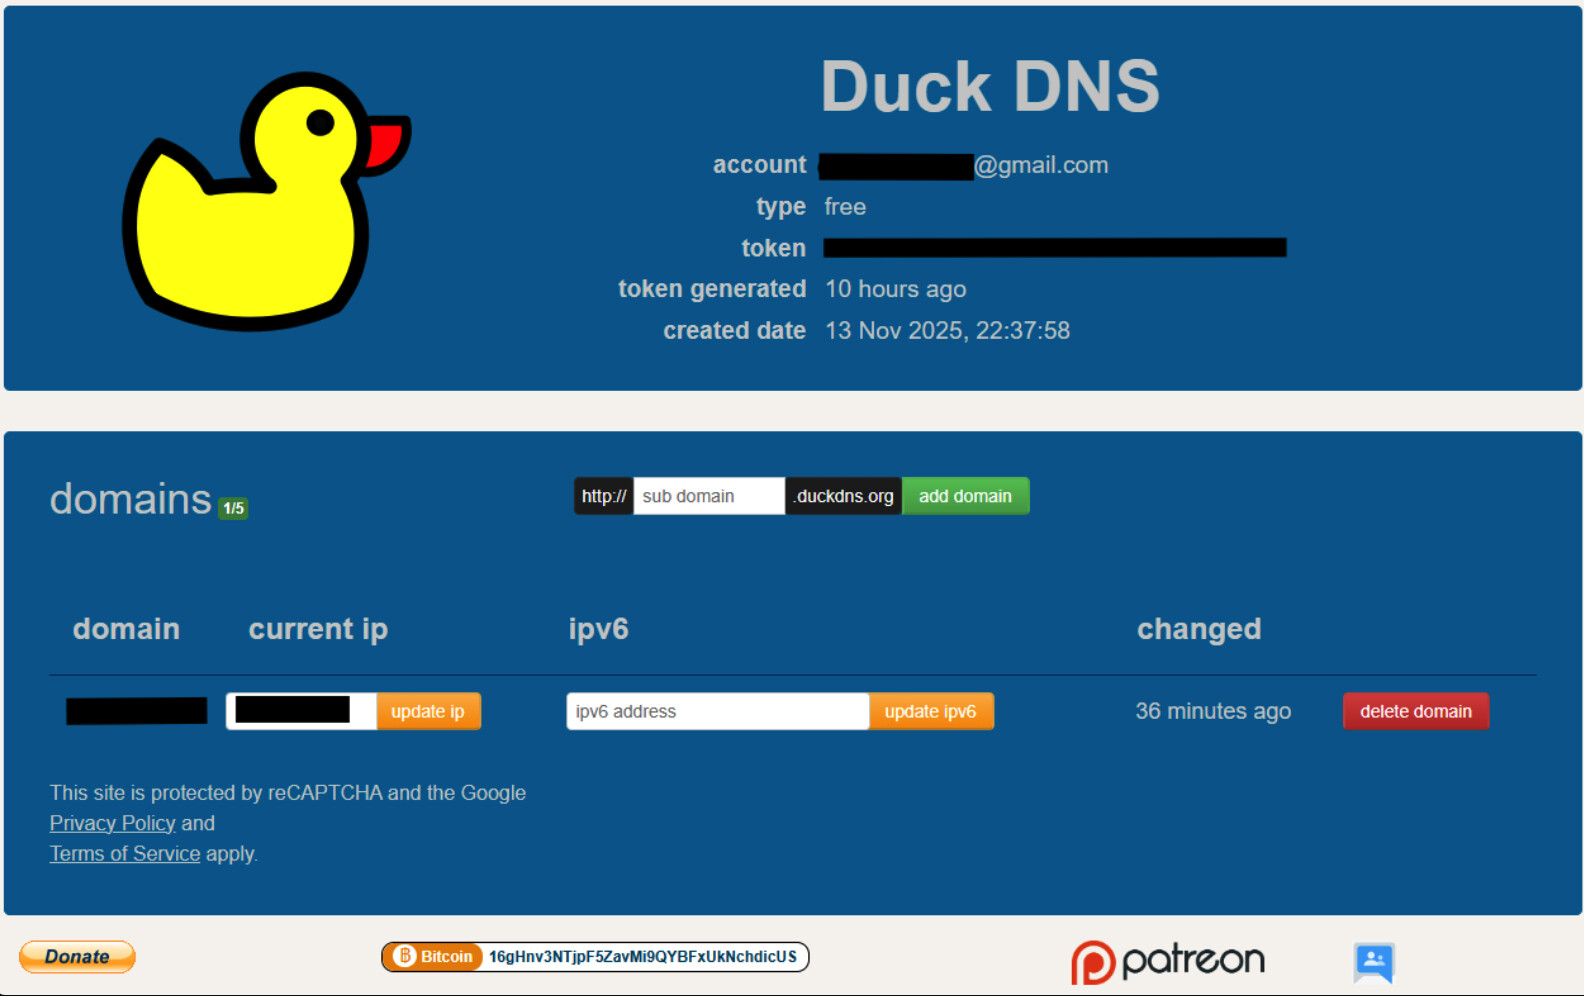
- Goto https://duckdns.org
- SignIn using one of the methods on the top.
- After you’ve loged in, you will see something like this:
-
Create a sub domain. As example let’s call it:
myawesomedomain.duckdns.org
Note
You should chose your own. If your domain is available go on to the next step, if not, chose another one.
- Next, we need to change the IP to the local IP of your device which will run your
nginx-proxy-manager(usually the same on which silverbullet is already running) then clickUpdate IP
Step 2. Install Docker
Note
If you already have docker installed, skip this step and go to the Step 3.
Update your system
Best to start with a clean slate rather than relying on whatever prehistoric packages your machine hoarded.
sudo apt update
sudo apt upgrade -y
Install Docker using the official convenience script
This is the fastest and most reliable way. Yes, it’s safe. No, it won’t summon demons.
curl -fsSL https://get.docker.com | sudo sh
Add your user to the docker group
Unless you enjoy typing sudo like an overworked intern.
sudo usermod -aG docker $USER
Log out and back in, or:
newgrp docker
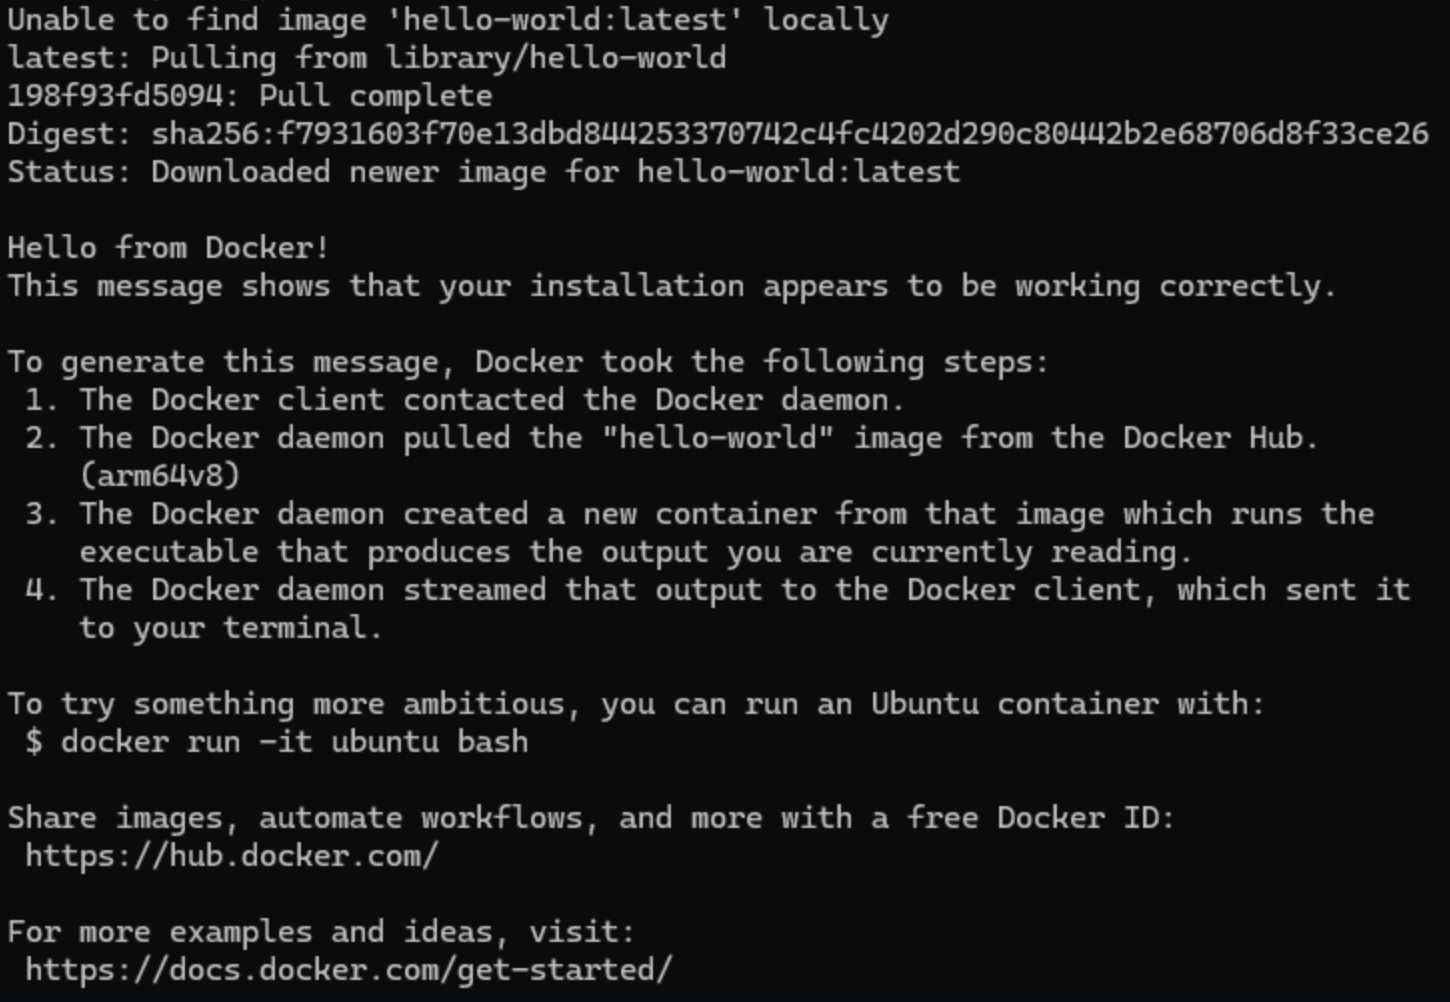
Test Docker
Just to confirm the universe hasn’t betrayed you.
docker run hello-world
If it prints following cheerful little message, you’re good.
Optional but recommended
Enable Docker to start at boot. Because the machines loves forgetting things.
sudo systemctl enable docker
Install Docker Compose (plugin version)
sudo apt install docker-compose-plugin
Check:
docker compose version
Step 3. Install Nginx-Proxy-Manager
Go to docker hub and search for nginx-proxy-manager
Choose jc21/nginx-proxy-manager
Create a folder and the docker compose file nginx-proxy-manager/docker-compose.yml
mkdir nginx-proxy-manager
cd nginx-proxy-manager
nano docker-compose.yml
Copy/paste this into the newly created file and replace yourUserName with your own:
services:
  nginx-proxy-manager:
     image: jc21/nginx-proxy-manager
     container_name: nginx-proxy-manager
     ports:
       - 80:80
       - 81:81
       - 443:443
     volumes:
       - /home/yourUserName/docker/volumes/nginx-proxy-manager/data:/data
       - /home/yourUserName/docker/volumes/nginx-proxy-manager/letsencrypt:/etc/letsencrypt
     restart: unless-stopped
Ctrl-o → Enter → Ctrl-x to save the file and quit
Deploy the container:
docker compose up -d
Wait until it downloads the image and starts the container (approx 370 MB)
Step 4. Nginx-Proxy-Manager Setup
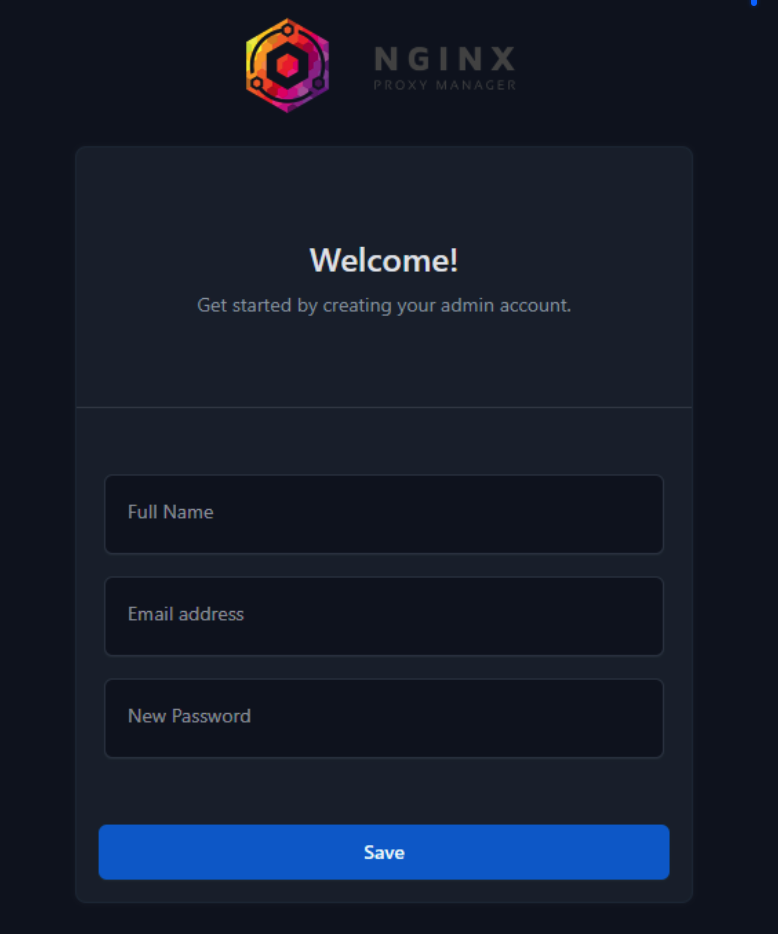
Go to youripaddress:81
eg. 192.168.1.69:81 and create a new user
Certificate creation
Go to Certificates and choose: Let’s Encrypt via DNS to add a new certificate using your domain from duckdns:
- add your domain created in Step 1 (or use your own domain)
yourawesomedomain.duckdns.org - add a wildcard domain too, so you can create multiple subdomains and the certificate to be valid for all of them:
*.yourawesomedomain.duckdns.org - add your credential / token from duckdns (or your own domain manager) to
Credentials File Content
dns_duckdns_token=yourToken-From-Duck-Dns-Website
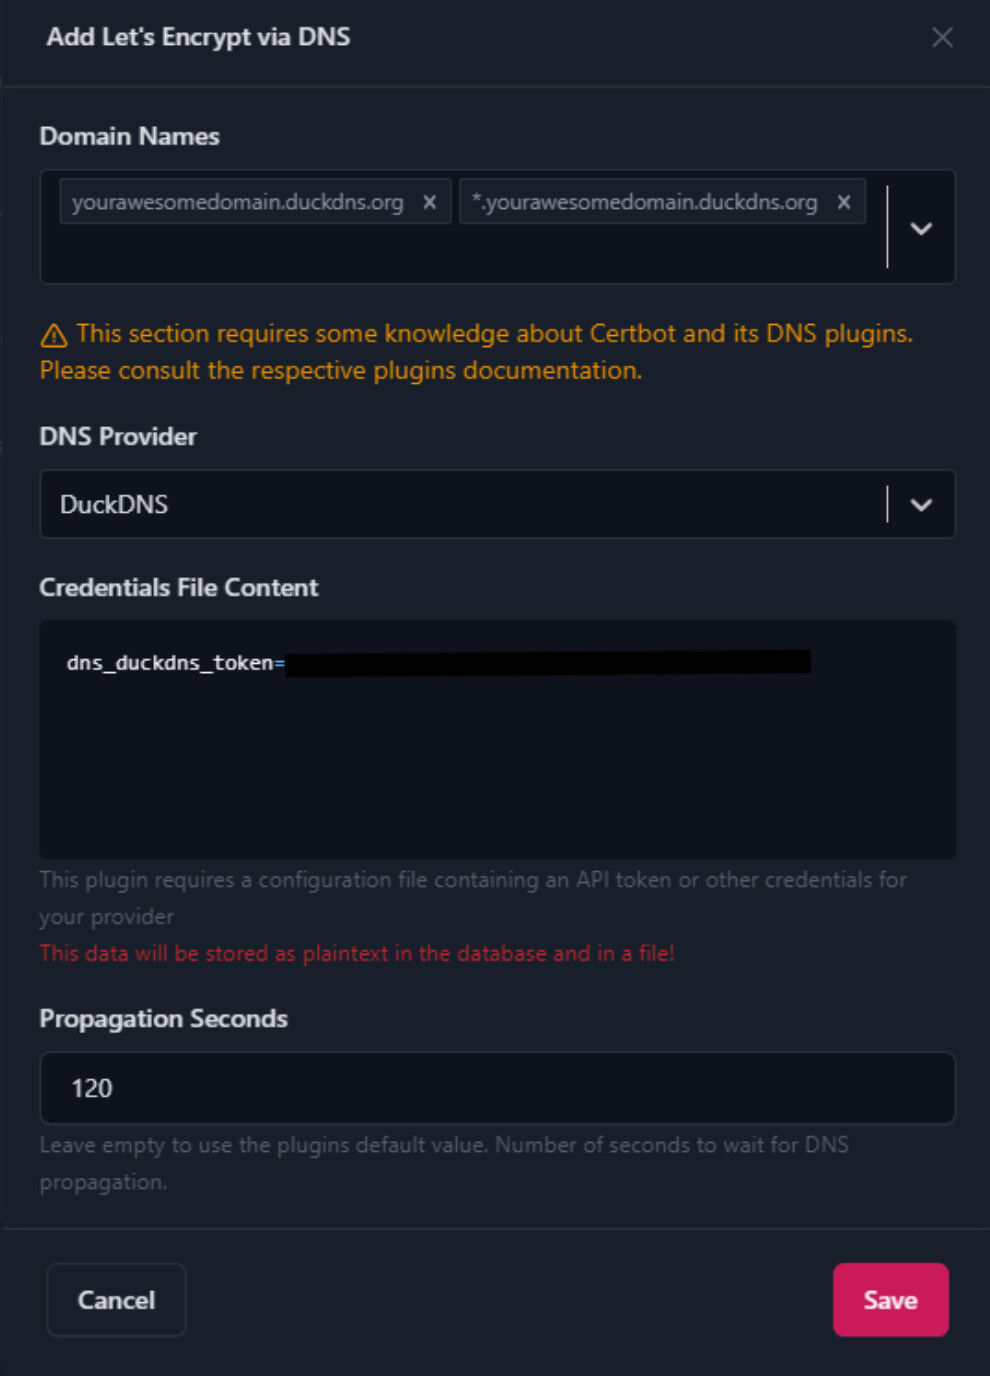
Click save and wait until the certificate is created
Note
This can take from 30 seconds to couple of minutes depending on the propagation time.
If it fails and see an internal error try to increase the propagation time
I had success with propagation time:120seconds
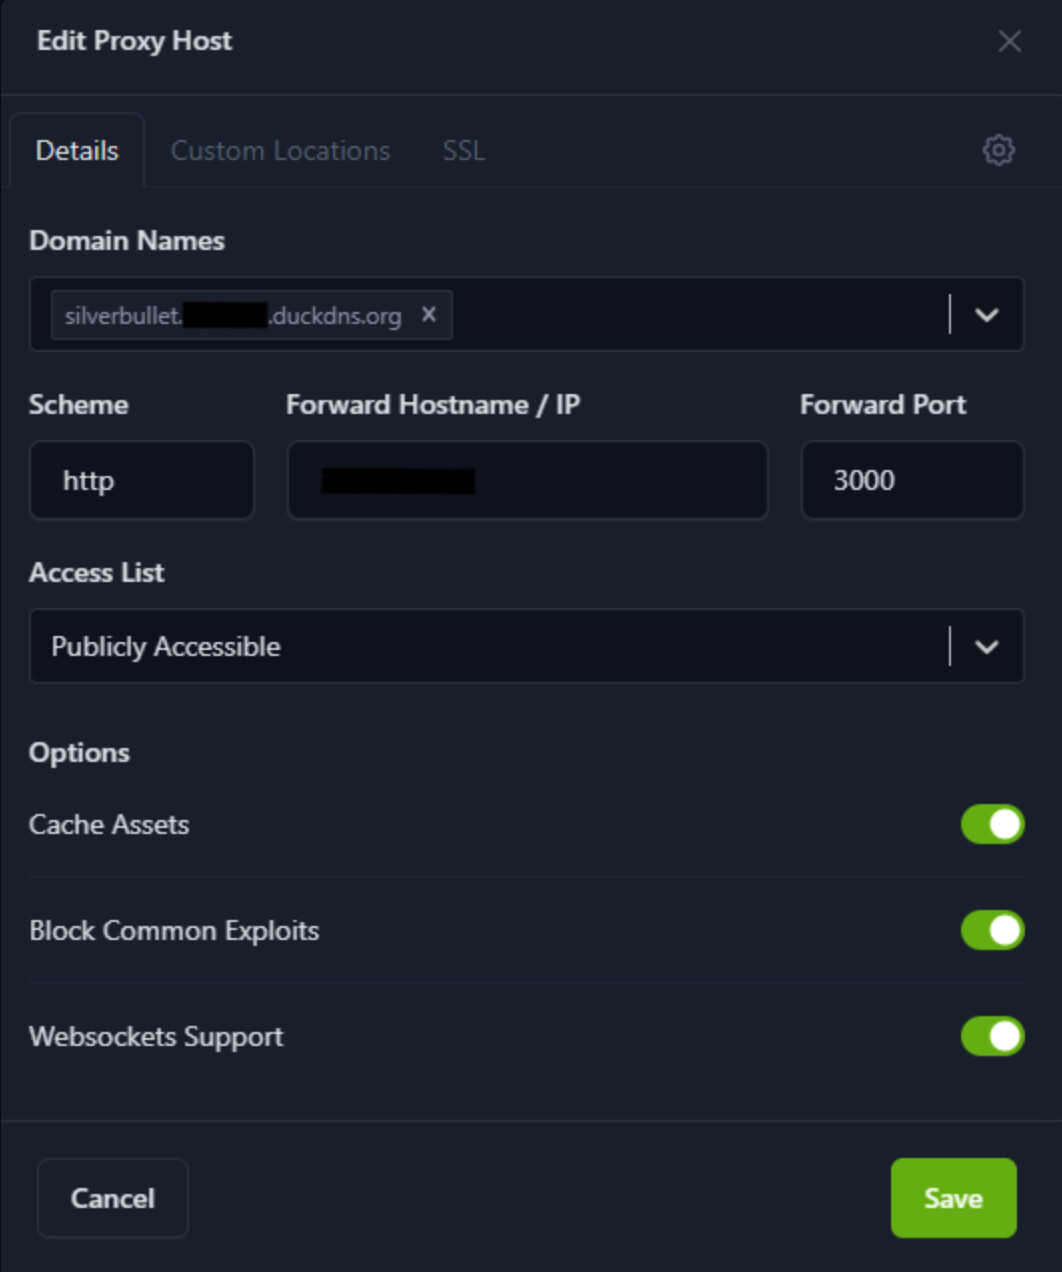
Configure silverbullet to use this newly created certificate
Goto Dashboard and Proxy hosts then Add Proxy Host
Create a subdomain for you subdomain, something like:
silverbullet.yourawesomedomain.duckdns.org
Then enter:
- Scheme:
http - Forward Hosname / IP :
192.168.1.69(the ip of where your silverbullet runs) - Forward Port:
3000(your silverbullet port)
You can optionally chose (but recommended):
- Cache Assets
- Block Common Exploits
- Websockets Support
Then go to SSL tab and select your certificate which we created in the previous step and enable:
- Force SSL
- HTTP/2 Support
- HSTS Enabled
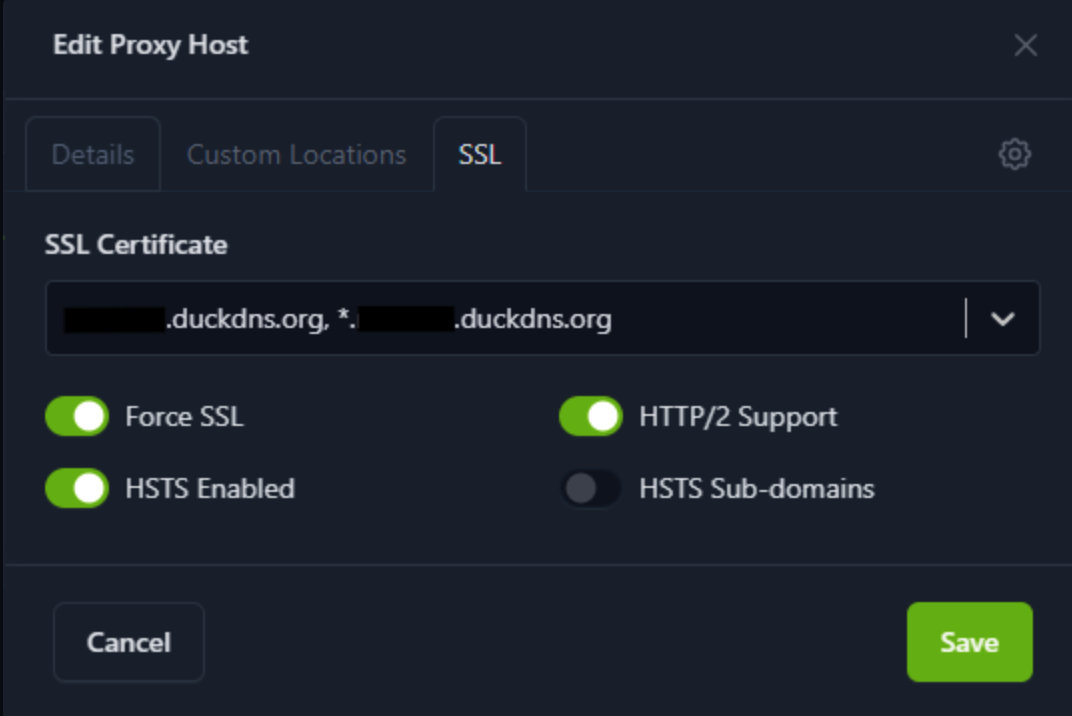
Click Save
As a bonus you can also add your nginx-proxy-manager to the hosts:
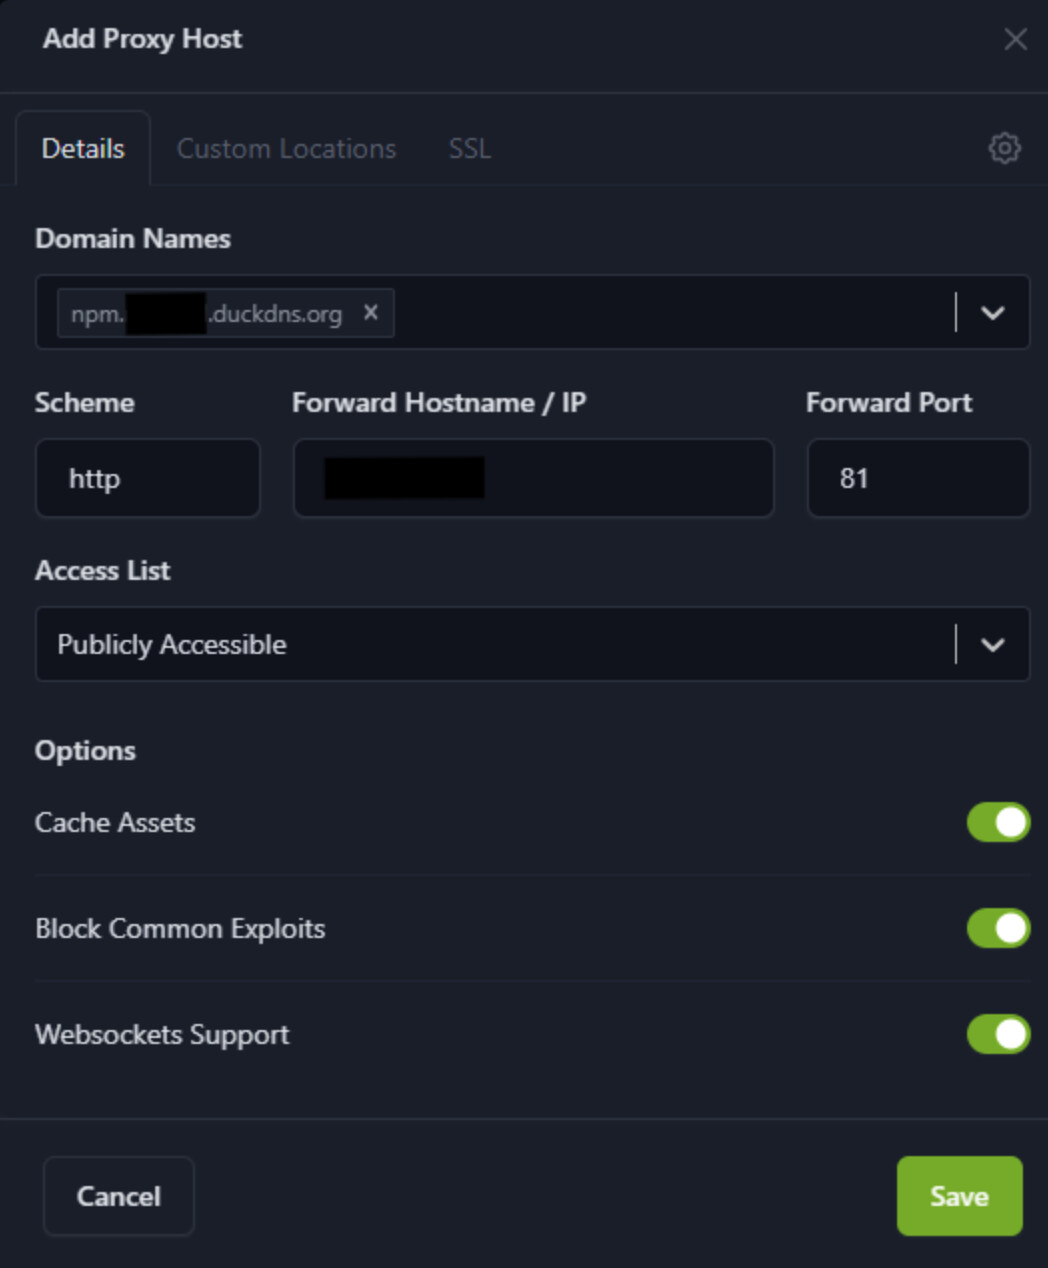
Chose the same options like above and click Save.
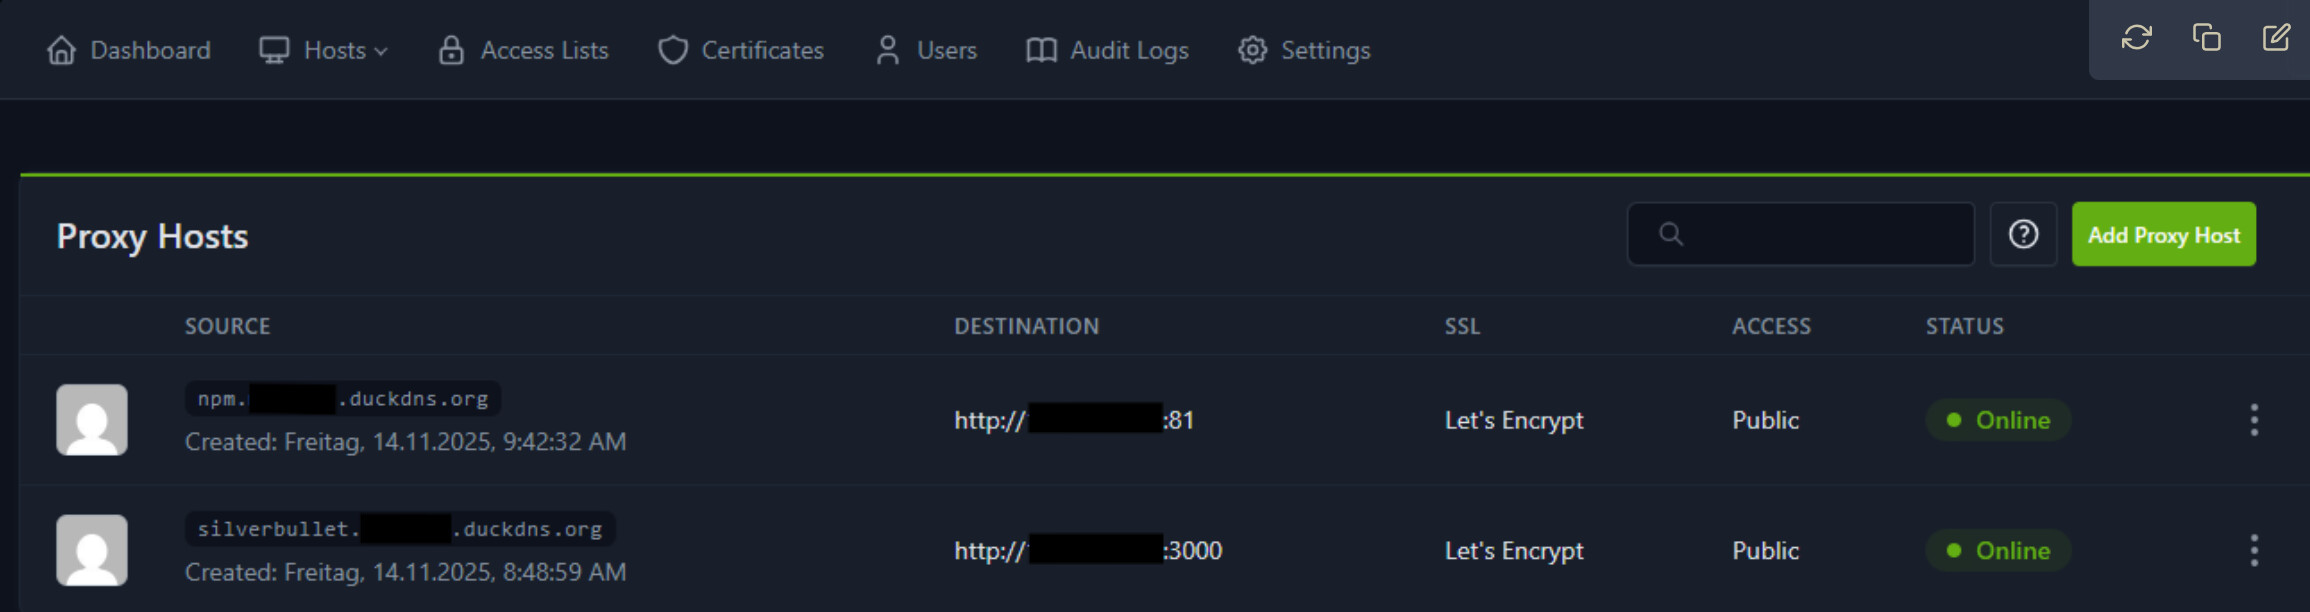
 Success
You have:
- Created your own subdomain
- Installed docker
- Added your
nginx-proxy-managercompose file - Setup
nginx-proxy-manager - Created your Let’s Encrypt Certificate
- Assigned that Certificate and Created your first reverse proxies
From now on you can access Silverbullet on:
https://silverbullet.yourawesomedomain.duckdns.org with a valid SSL certificate from Let’s Encrypt.
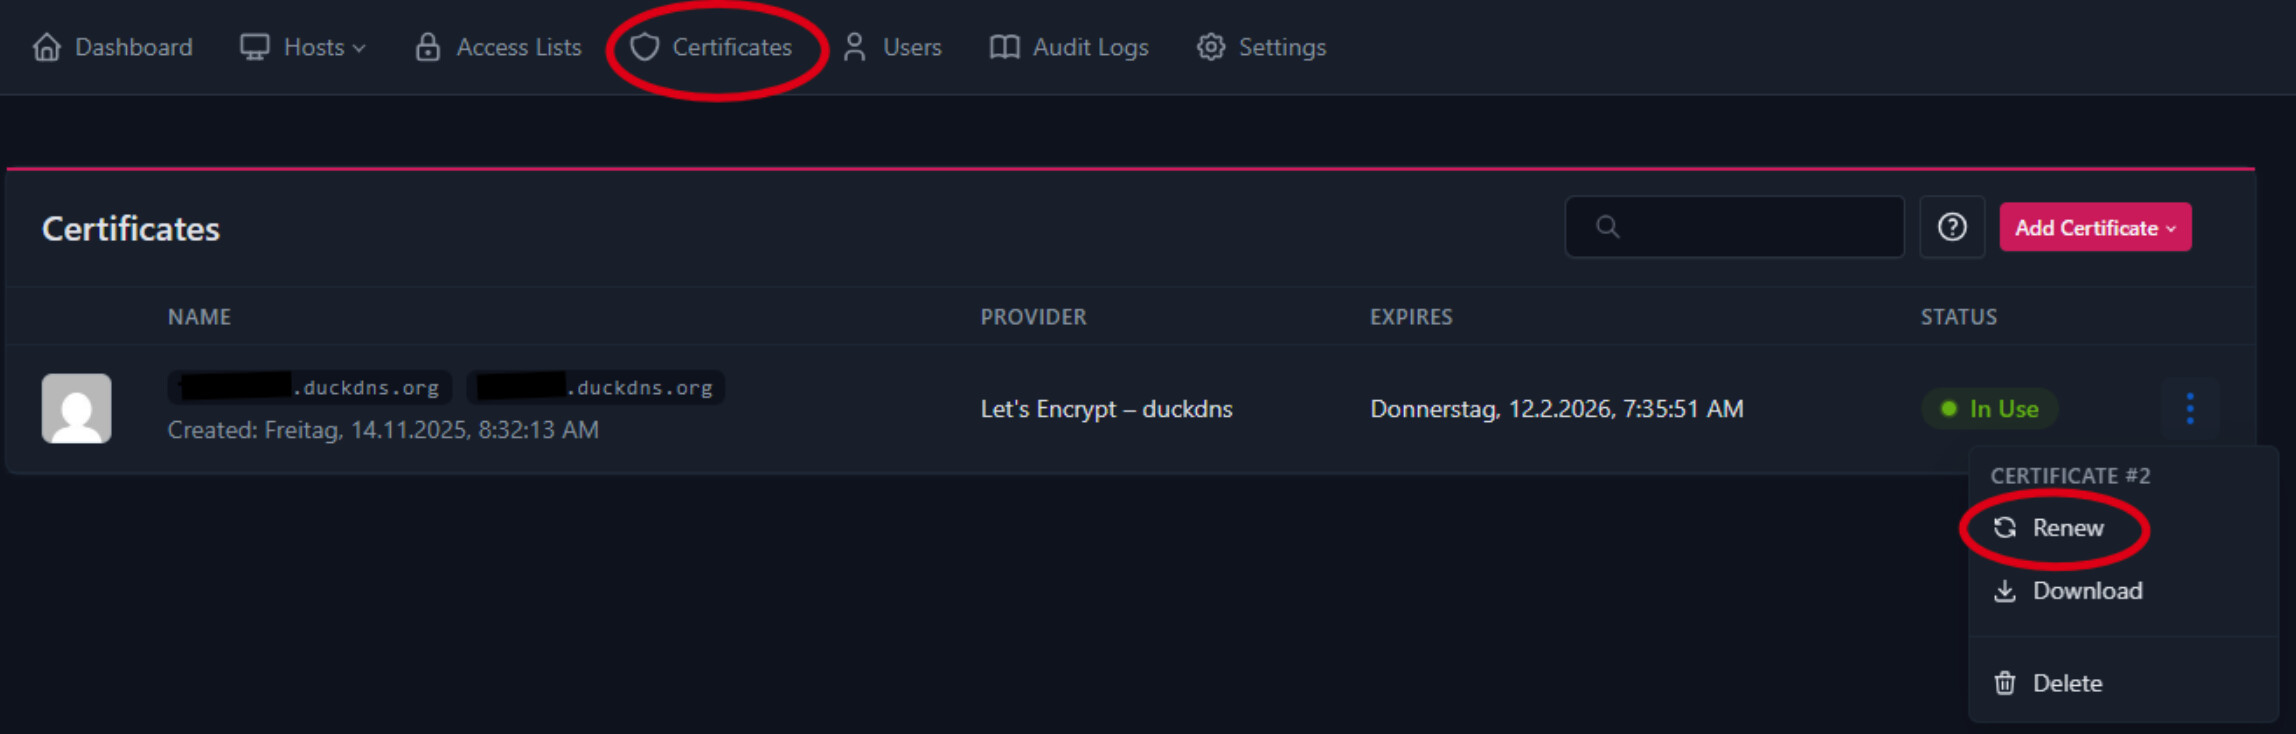
Step 5. Renew Certificates (after 3 months)
Let’s Encrypt certificates are valid 3 months, so you need to renew the certificate every 3 months.
You can do this by going to Certificates → Dots Hamburger Menu → Renew